Spring Security: Authentication Architecture Explained In Depth
This blog post is 3500 words long, so it requires time. You probably want to bookmark it and come back later.
Worth to mention that this blog post is probably for those who already have experience in Spring Security.
Spring Security is the framework most Java developers touched at least once during their career. Sooner or later, we need to secure our application. However, Spring Security is not easy to understand at first glance. Most tutorials on the internet are giving an example project showing how to set up configurations, which usually works, but does not explain how the architecture works behind it very well.
Scenario 1: Project initiation
First of all, let's create a new Maven project. We only add Spring Boot Web dependency in pom.xml.
<dependencies>
    <dependency>
        <groupId>org.springframework.boot</groupId>
        <artifactId>spring-boot-starter-web</artifactId>
    </dependency>
</dependencies>
Let's add a simple endpoint which says "Hello" when we hit the endpoint.
@SpringBootApplication
public class SimpleStart {
    public static void main(String[] args) {
        SpringApplication.run(SimpleStart.class, args);
    }
}

@RestController
class BasicController {
    @GetMapping("/hello")
    public ResponseEntity<String> get(){
        return ResponseEntity.ok("Hello");
    }
}
We can get Hello as a response if we run this application and hit http://localhost:8080 now. This will work without any security concern.
But wait... What is the magic behind this Spring Boot Web dependency?
Spring Boot Web is covering Spring MVC sub-framework and bunch of configurations inside. We are interested in Spring MVC here. Because Spring MVC sends all incoming HTTP requests into a single servlet named DispatcherServlet.
DispatcherServlet is a servlet delegates all these HTTP requests to your controller classes where you define your endpoints. Back in the days, we used to define new servlet classes for new pages. Luckily, Spring framework did bring single servlet concept and implemented DispatcherServlet, so we can just focus on our business logic.
This means if you protect DispatcherServlet, you protect your application.
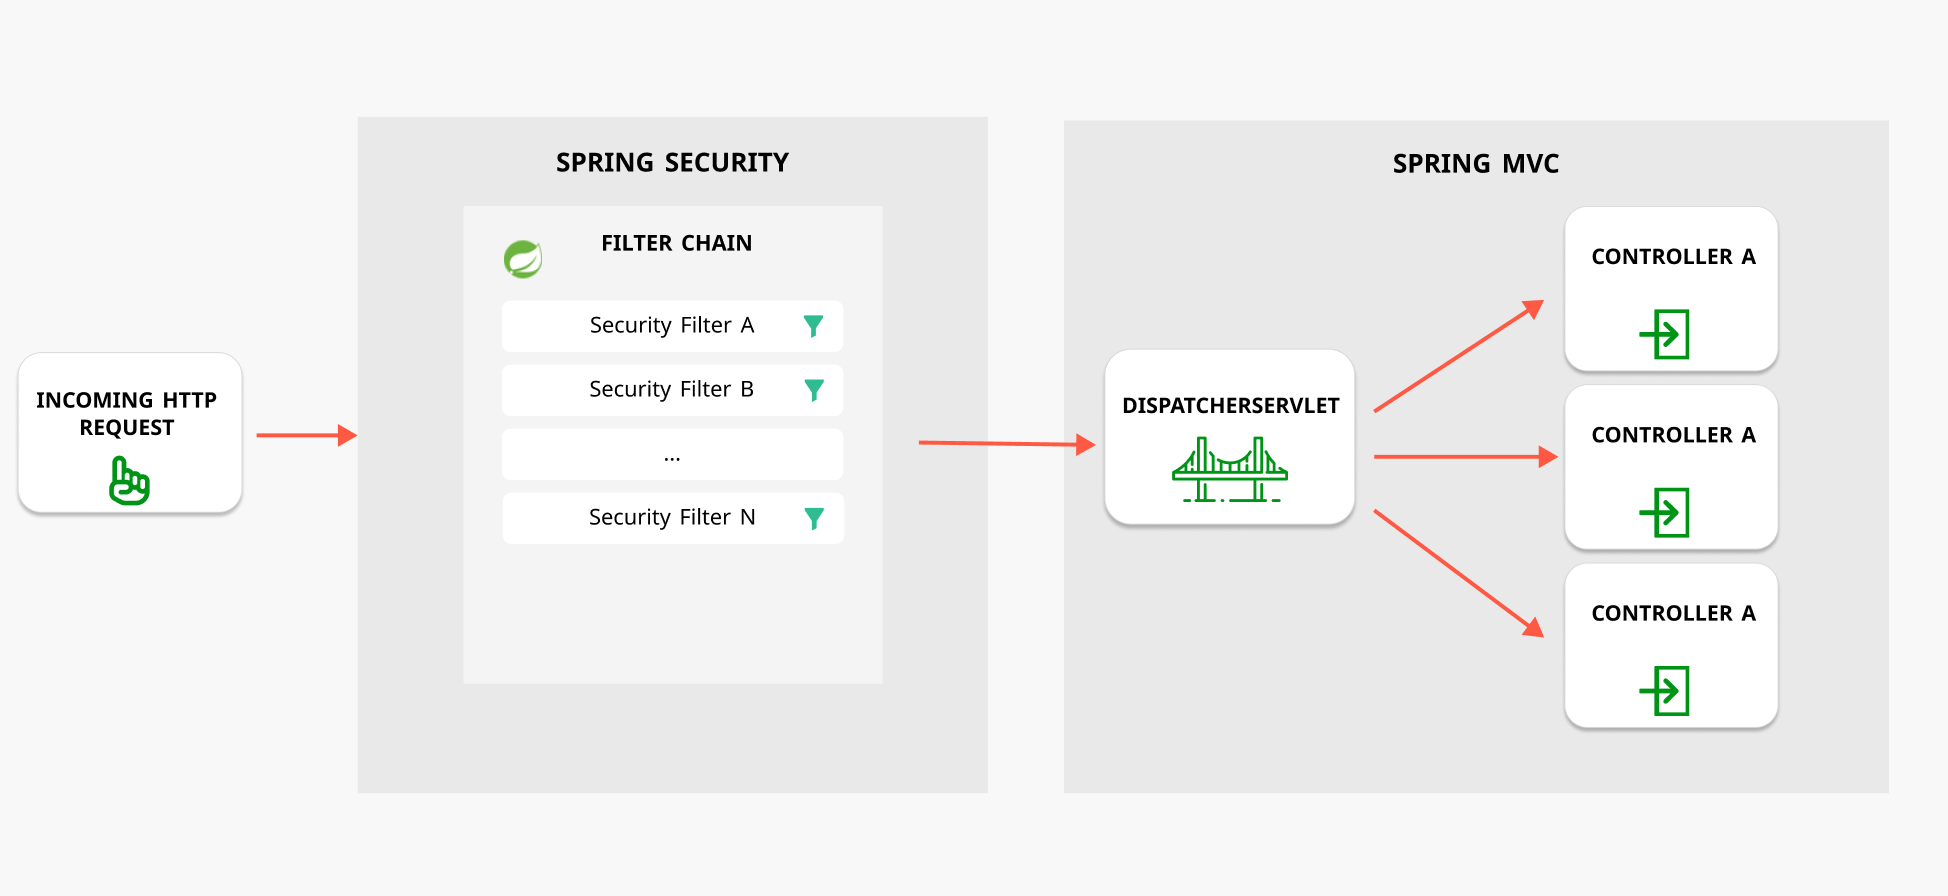
Spring Security comes into action here by adding filter classes before HTTP request hit the DispatcherServlet. This means any incoming request will visit these filter classes one by one. This way, I can check Authentication and Authorization states before the request hit DispatcherServlet and then controllers. In short, this is what Spring Security does.
Before explaining Filter Chain, we need to understand Authentication and Authorization concepts.
- Authentication: Any incoming user has to be identified by our application. We basically need to know Who is the user? This is why we have login pages. We get username and password, then go and check if we have this person in our database as a user. If so, we authenticate the person.
- Authorization: Once we authenticate the user, we should also be able to limit what the user can see in our application. While Admin user should see everything on the application, basic user should only see certain pages.
Filter Chain
Here you can see default order of filters in Spring Security. The official Spring Security documentation recommends to use these filters in this order.
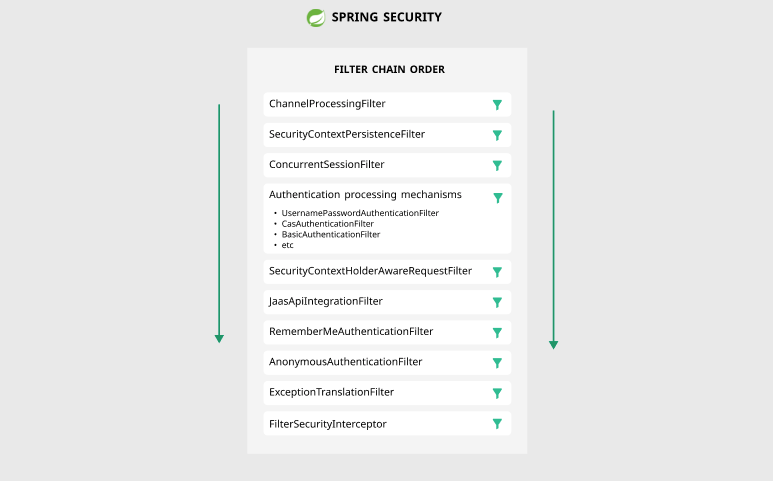
For instance, we will add our custom authentication filter just before UsernamePasswordAuthenticationFilter, because authentication mechanism starts from that filter. See Scenario 3 later in this blog.I will not explain what all these filters do, because you can easily go and read the official documentation. But we can look at some important filters and their explanations here:
- BasicAuthenticationFilter: As it says in the name, this filter tries to find basic authentication header and authenticate the user by calling authentication manager.
- UsernamePasswordAuthenticationFilter: This filter tries to find username and password from a request body, which HTTP method's is POST. It tries to authenticate by calling authentication manager.
- FilterSecurityInterceptor: Basically, this filter controls authorization in the application
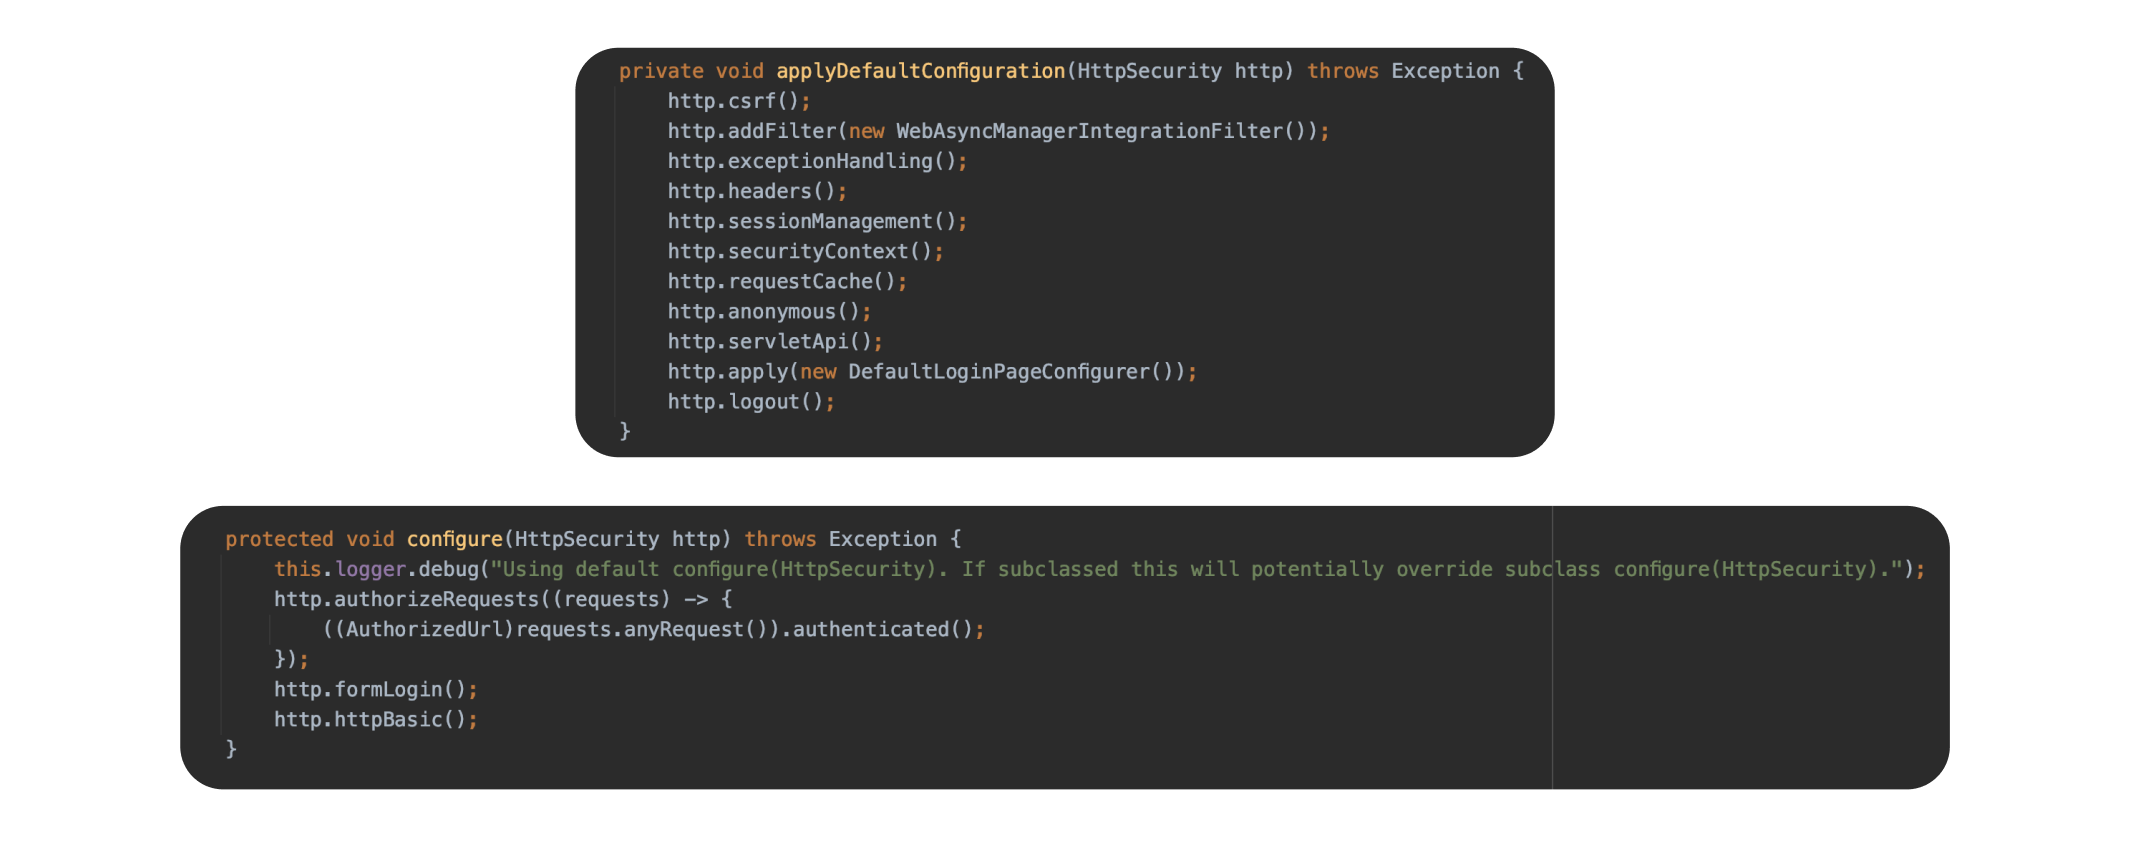
Wait wait... Some magic is happening again. There are many filter classes for authentication and authorization purposes. There are also default login and logout pages. Where can I see default behaviours? There are many possibilities here.
Answer is easy. Every time we set up Spring Security, we extend a class named WebSecurityConfigurerAdapter to do configurations. This class is Spring Security's implementation.
Press Shift twice to open the Search Everywhere window in Intellij IDEA and type WebSecurityConfigurerAdapter, you will access the default configurations. For instance, you can see some methods doing default settings from WebSecurityConfigurerAdapter below.
Scenario 2: Adding Spring Security dependency
Since we understand how our HTTP requests hits @Controller or @RestController classes, it is time to add Spring Security dependency.
<dependencies>
    <dependency>
        <groupId>org.springframework.boot</groupId>
        <artifactId>spring-boot-starter-web</artifactId>
    </dependency>
    <dependency>
        <groupId>org.springframework.boot</groupId>
        <artifactId>spring-boot-starter-security</artifactId>
    </dependency>
</dependencies>
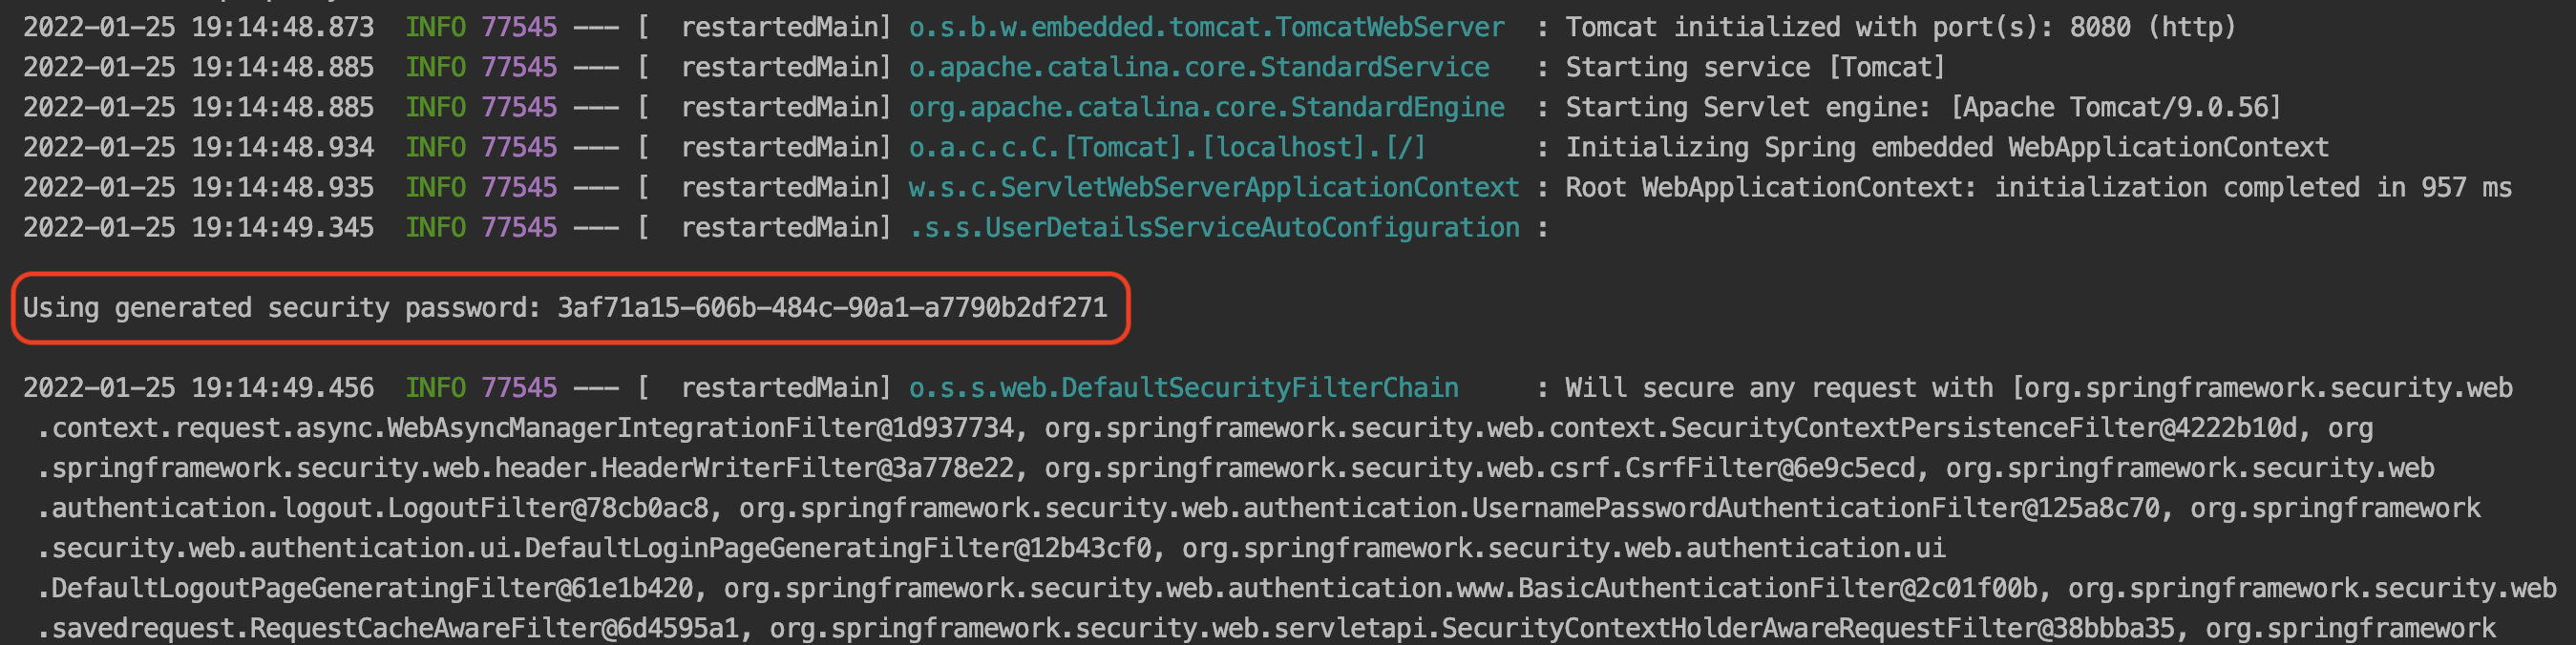
We run the application again and this time you will see generated password in the logs. Spring Security automatically creates a default username and password, because we did not set any configurations yet.
Username: user
Password: <Generated Password from logs>
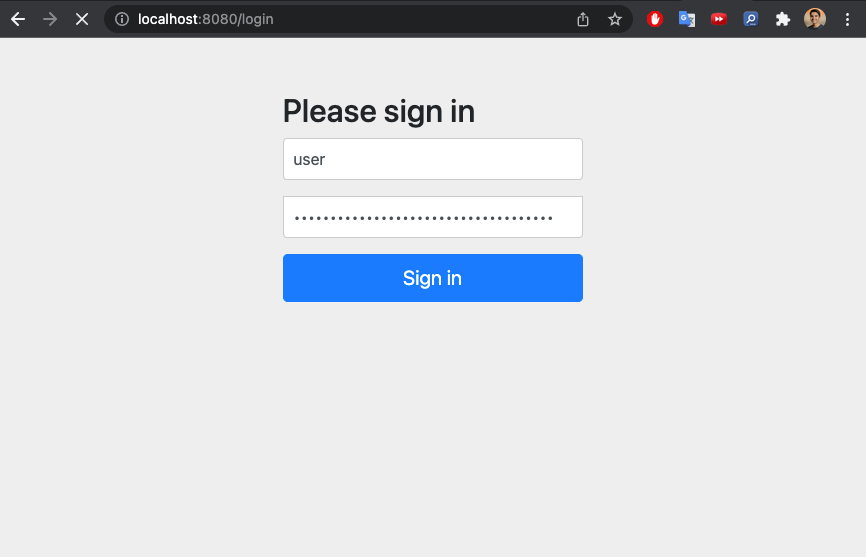
Spring Security also sets up default login page for us. You can go here and see it. http://localhost:8080/login
Here, we should pause a bit and understand how Spring Security work under the hood.
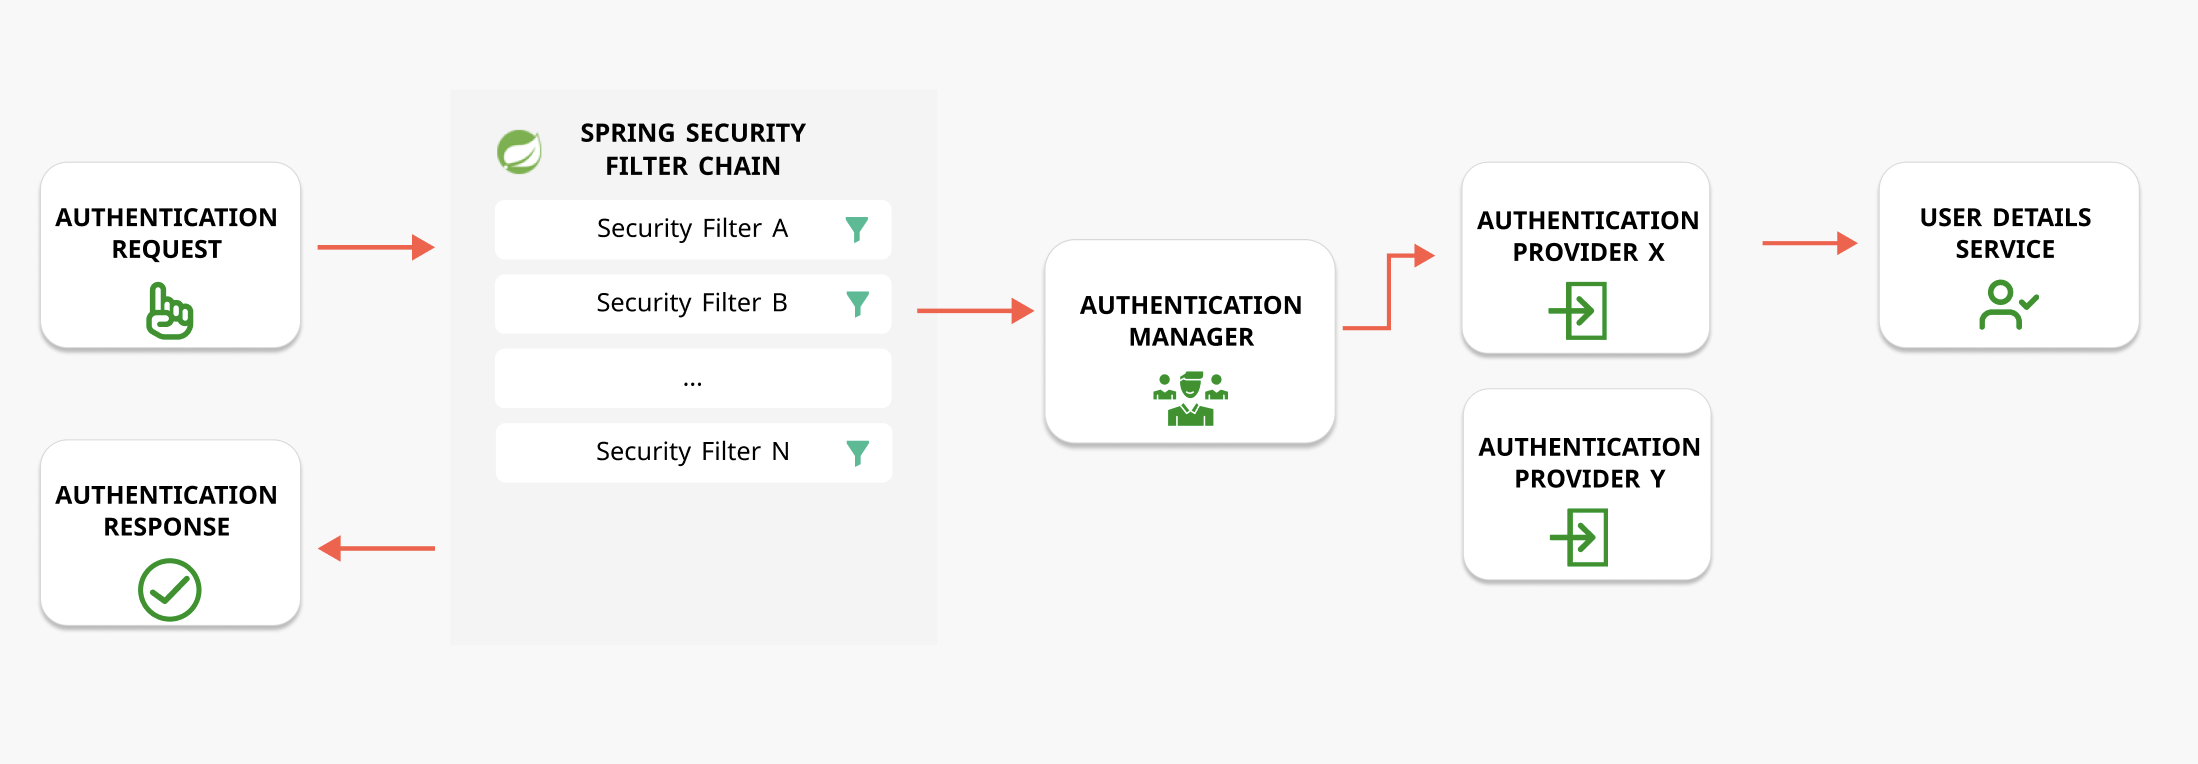
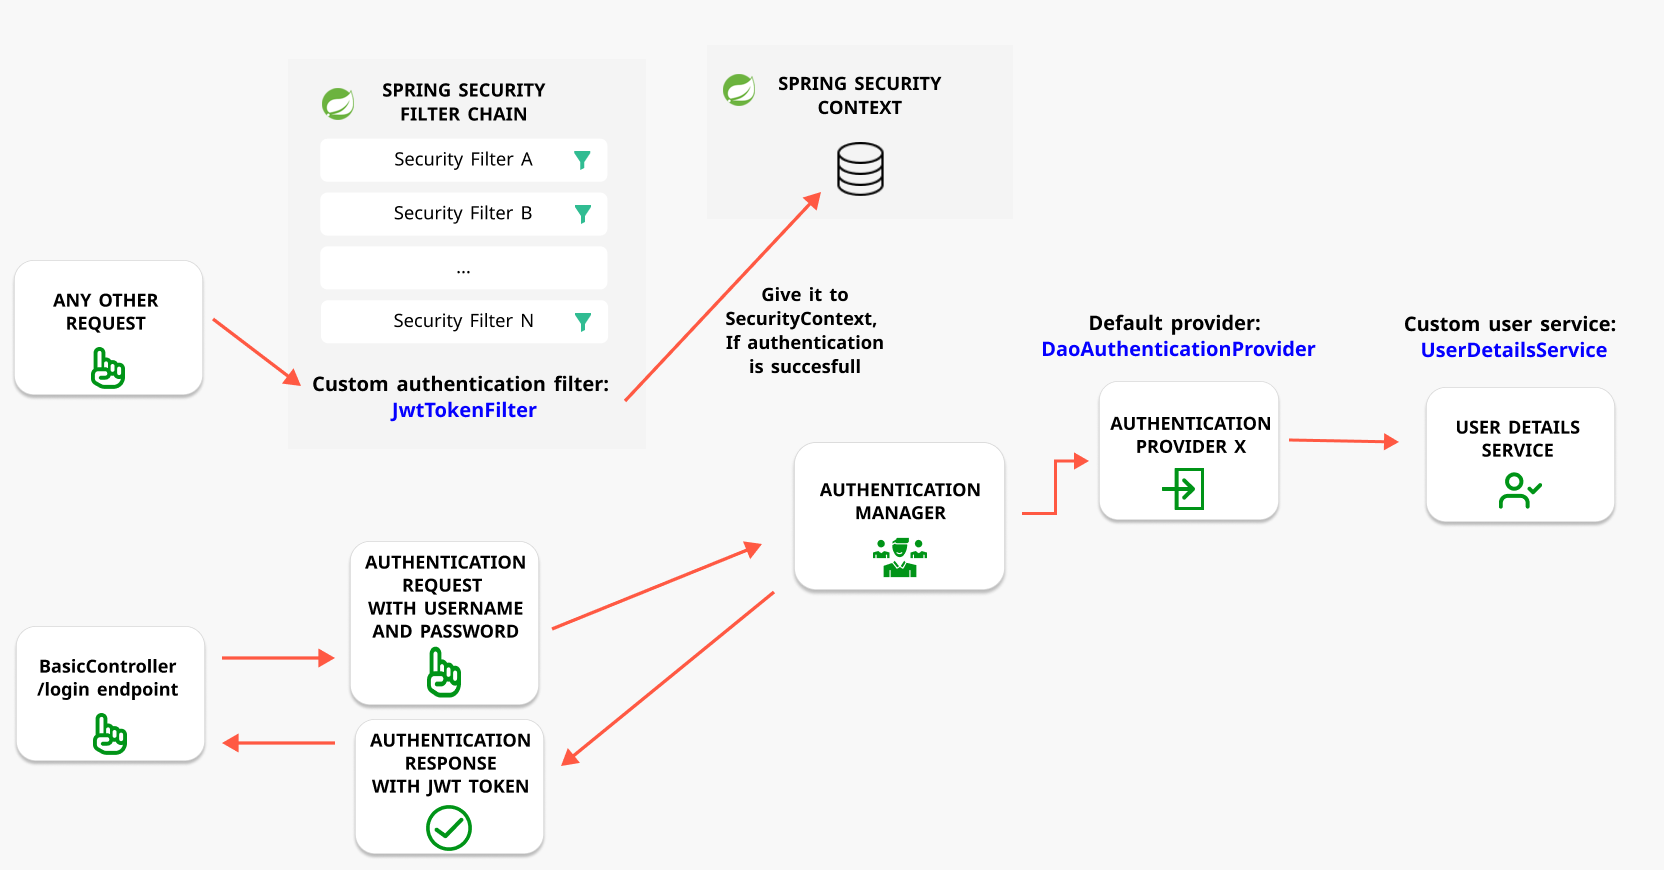
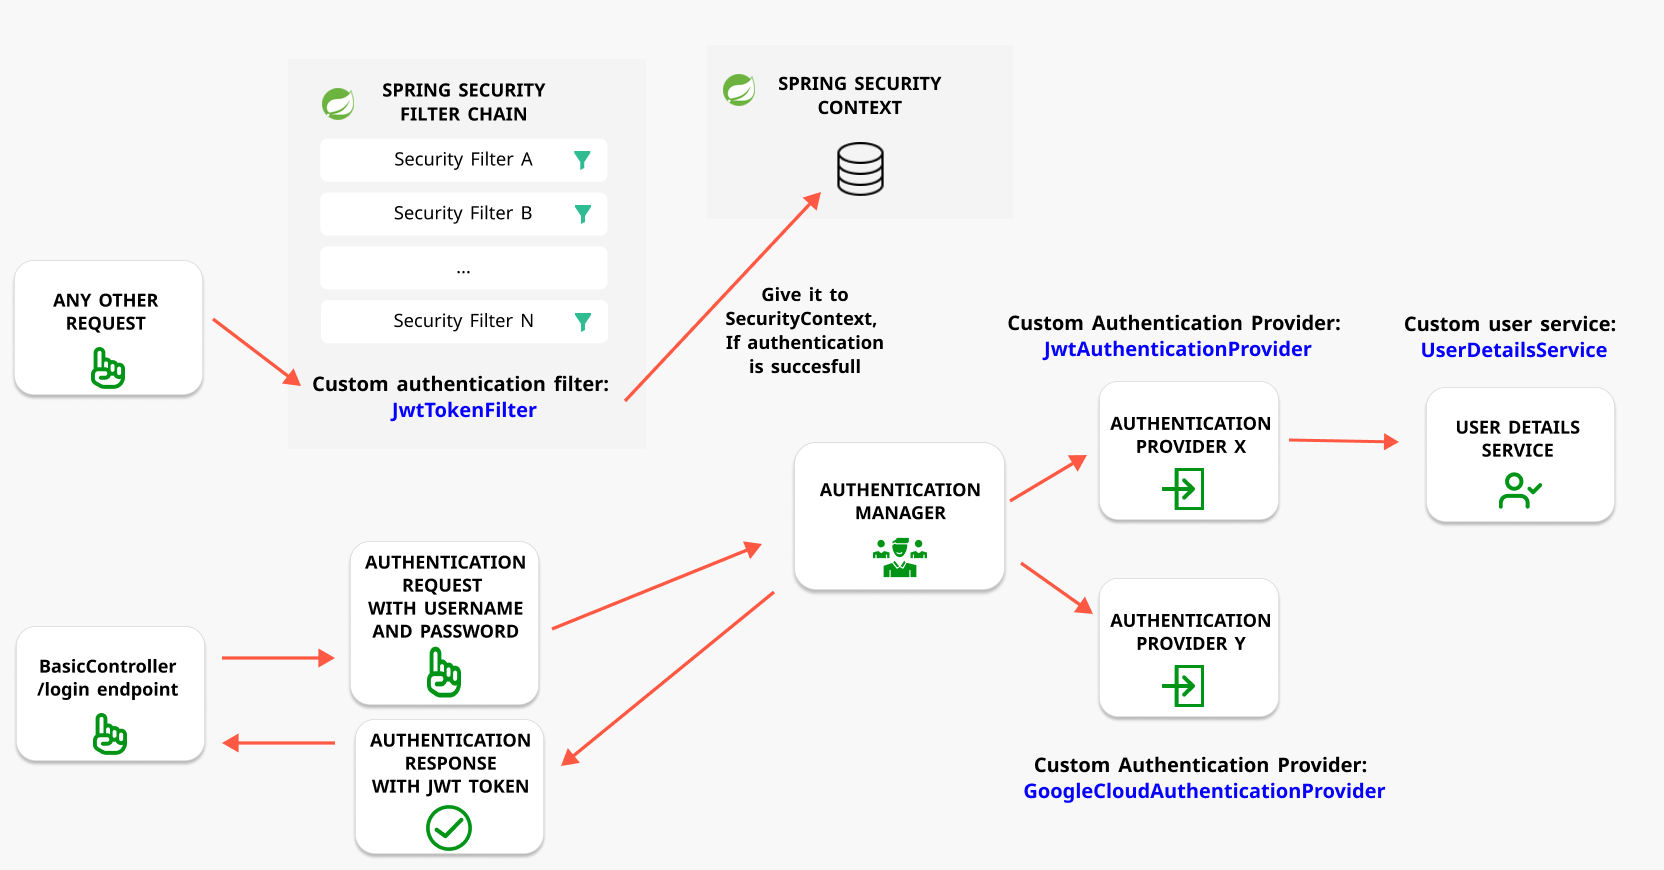
When we have an authentication request, it goes to Spring Security Filter Chain. It visits all the filters one by one and finally hit the authentication filter. Authentication filter then calls Authentication Manager. Authentication Manager's responsibility is going through all these providers and try to get at least one success to authenticate the user. Authentication Provider fetches user by communicating with User Details service and returns success state if the user exists with given credentials. Otherwise, Authentication Provider is supposed to throw an exception. By this, Spring Security knows this specific Authentication Provider failed to find the user.
Now, we can get back to our login page and press the sign-in button with our default user and generated password. This action will send a new authentication request. This request will result following diagram.
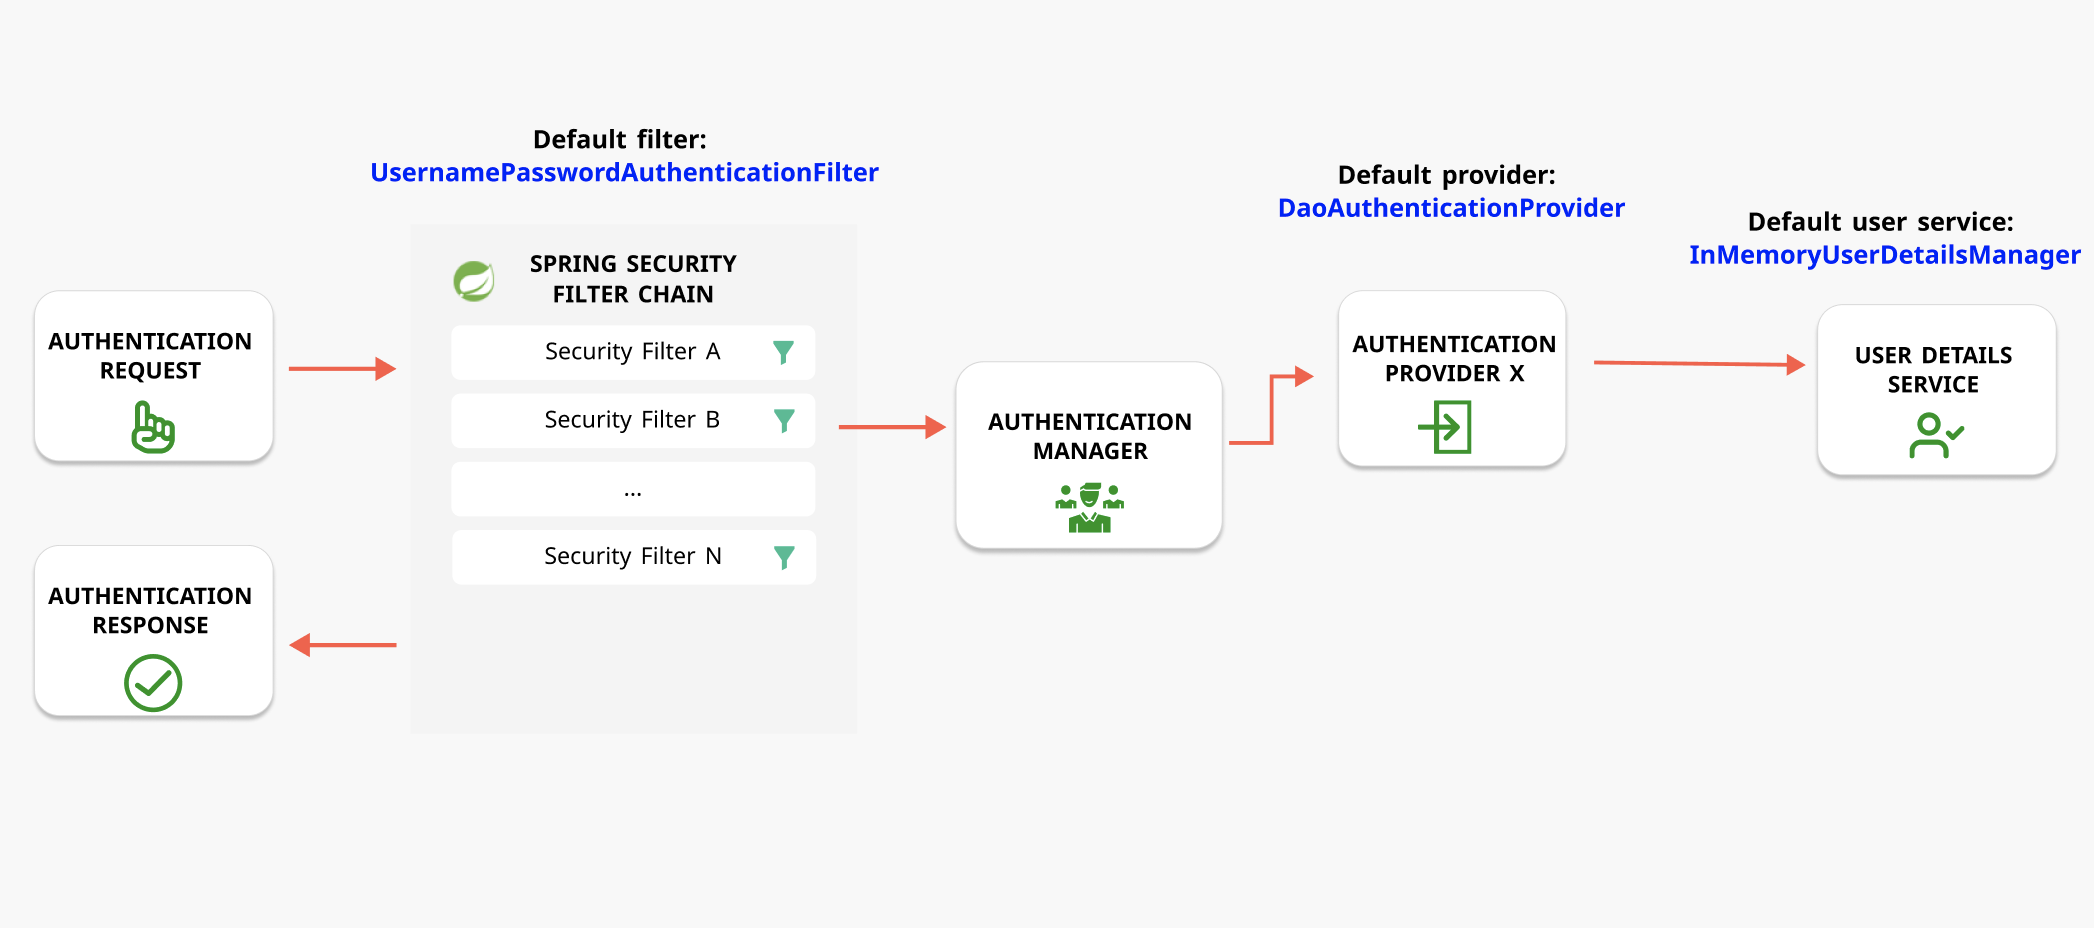
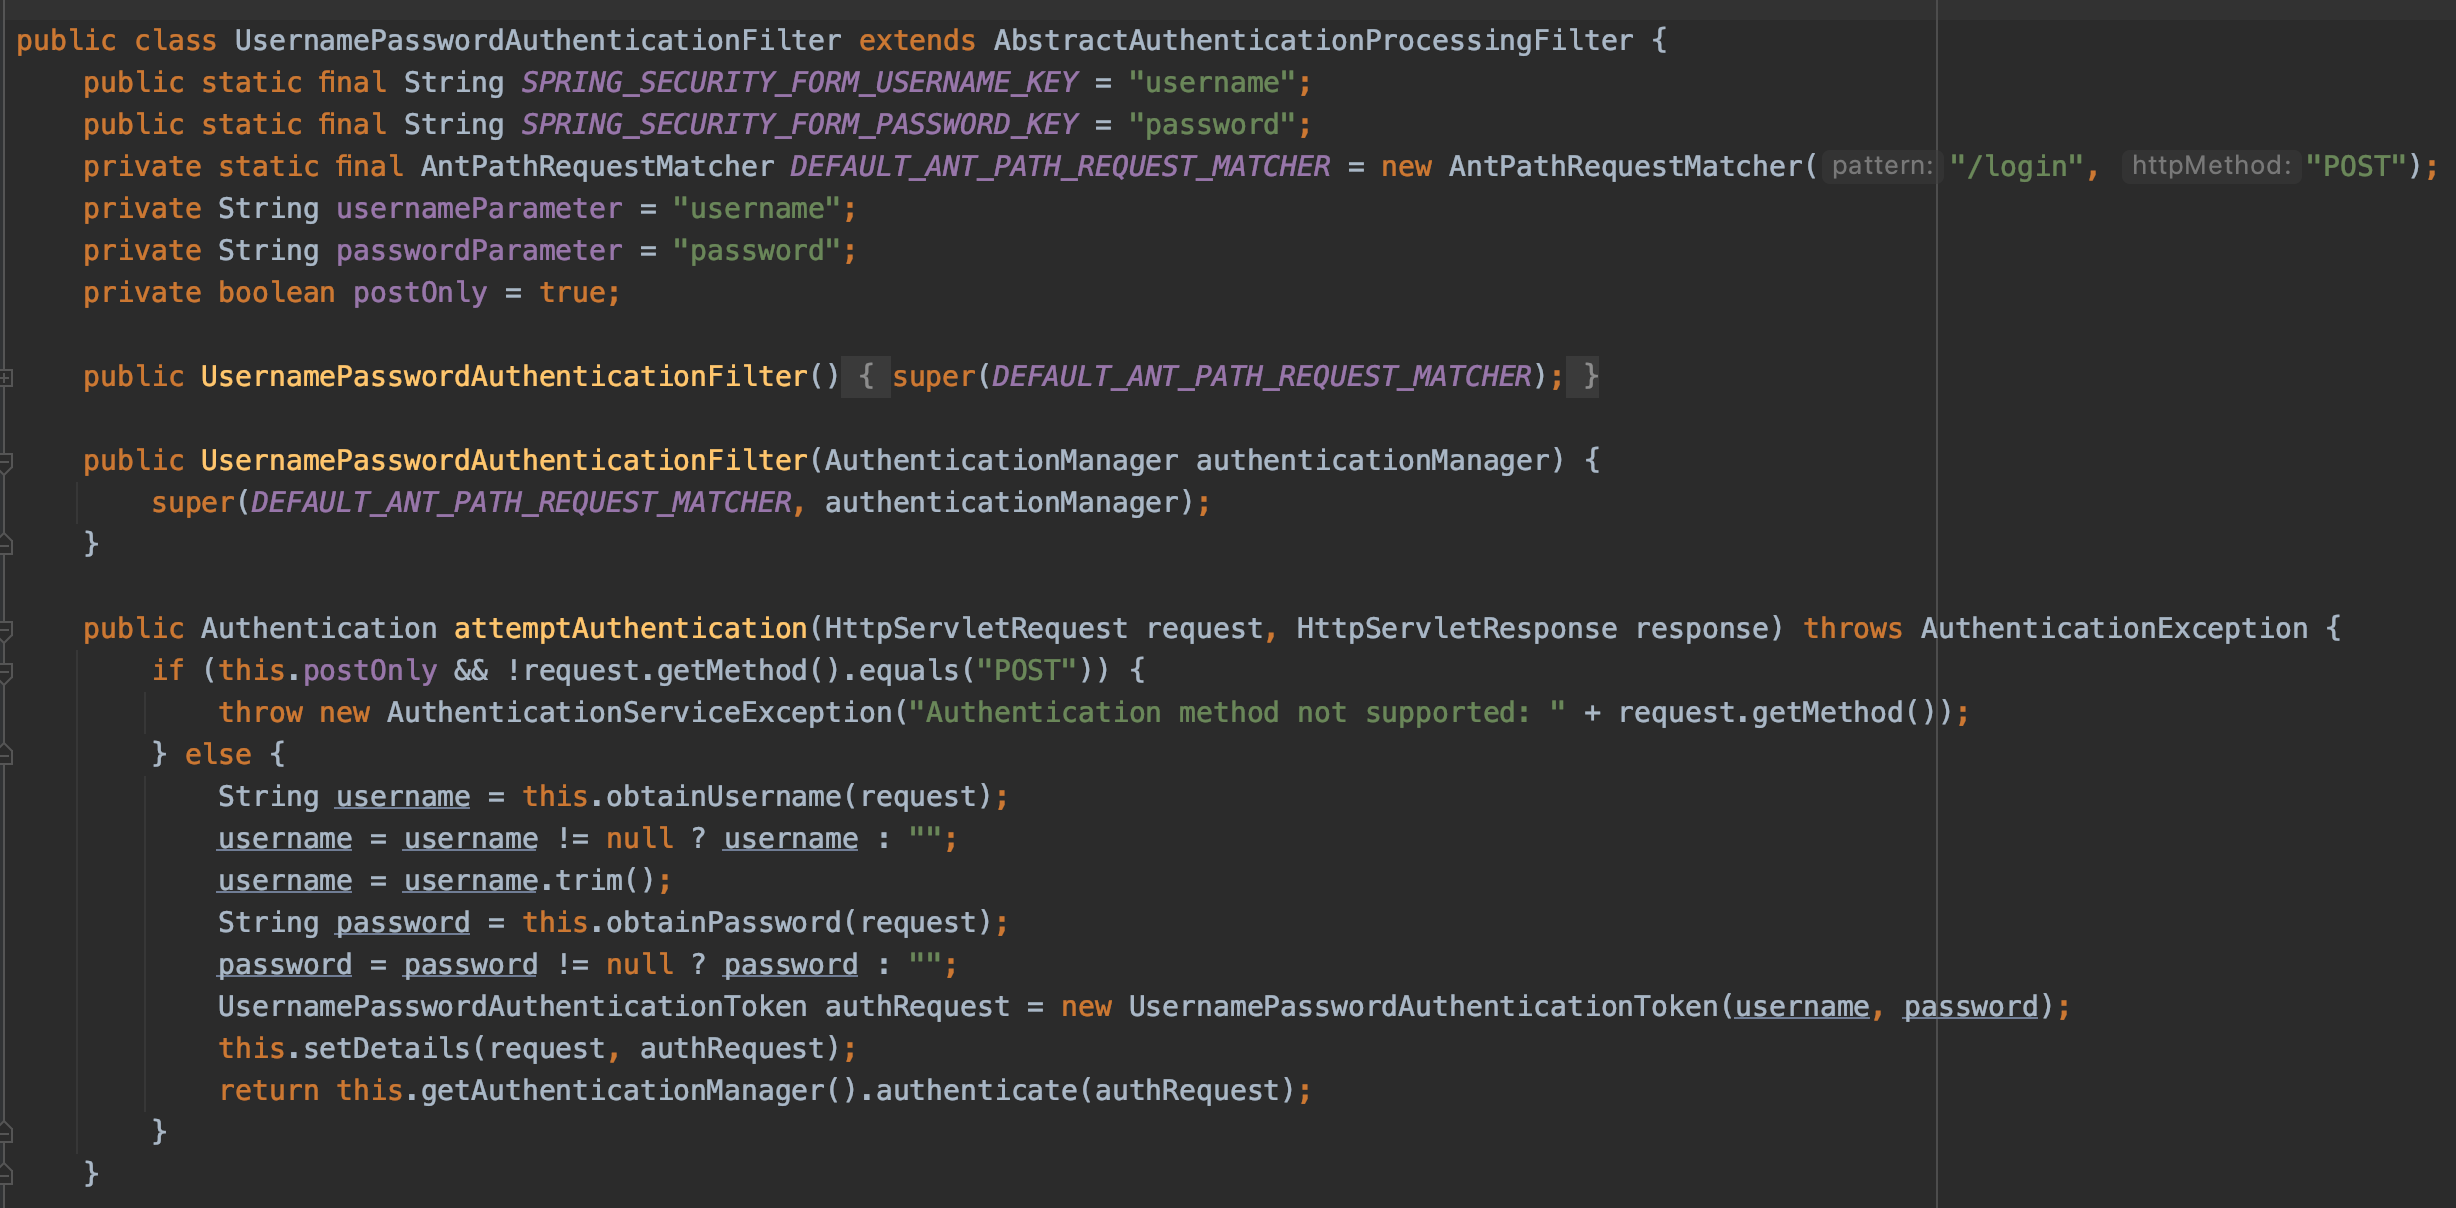
The new authentication request goes to Spring Security Filter Chain and get caught by UsernamePasswordAuthenticationFilter. This is a default filter designed for the default form login.
UsernamePasswordAuthenticationFilter will extract username and password from the authentication request and send them to Authentication Manager. Authentication Manager then send these username and password to DaoAuthenticationProvider, which is default provider. And this provider will go to InMemoryUserDetailsManager, which is default user details service, and check if user exists with given credentials.
In Intellij IDEA, press Shift twice to open the Search Everywhere window and type UsernamePasswordAuthenticationFilter. You can put a debug point in attemptAuthentication() method and follow the process to understand better.
Scenario 3: Setting up custom filter and custom user details service
So far we used default classes for securing our application. It is time to set our custom beans and prepare better application for production level.
We add JWT and Lombok dependencies in our pom.xml. Lombok will make the code shorter. JWT dependency will help us to generate and validate JWT tokens for the authentication steps.
...
    <dependency>
        <groupId>org.springframework.boot</groupId>
        <artifactId>spring-boot-starter-web</artifactId>
    </dependency>
    <dependency>
        <groupId>org.springframework.boot</groupId>
        <artifactId>spring-boot-starter-security</artifactId>
    </dependency>
    <dependency>
        <groupId>org.projectlombok</groupId>
        <artifactId>lombok</artifactId>
        <version>1.18.22</version>
        <scope>provided</scope>
    </dependency>
    <dependency>
        <groupId>io.jsonwebtoken</groupId>
        <artifactId>jjwt-api</artifactId>
        <version>0.11.2</version>
    </dependency>
    <dependency>
        <groupId>io.jsonwebtoken</groupId>
        <artifactId>jjwt-impl</artifactId>
        <version>0.11.2</version>
        <scope>runtime</scope>
    </dependency>
    <dependency>
        <groupId>io.jsonwebtoken</groupId>
        <artifactId>jjwt-jackson</artifactId>
        <version>0.11.2</version>
        <scope>runtime</scope>
    </dependency>
...Let's also define very simple JWT util class. You do not need to pay attention here. We will only use generate and validate methods from this class.
@Service
public class JwtUtil {

    private static final int expireInMs = 60 * 1000;

    private final static Key key = Keys.secretKeyFor(SignatureAlgorithm.HS256);

    public String generate(String username) {
        return Jwts.builder()
                .setSubject(username)
                .setIssuer("backendstory.com")
                .setIssuedAt(new Date(System.currentTimeMillis()))
                .setExpiration(new Date(System.currentTimeMillis() + expireInMs))
                .signWith(key)
                .compact();
    }
    public boolean validate(String token) {
        if (getUsername(token) != null && isExpired(token)) {
            return true;
        }
        return false;
    }

    public String getUsername(String token) {
        Claims claims = getClaims(token);
        return claims.getSubject();
    }

    public boolean isExpired(String token) {
        Claims claims = getClaims(token);
        return claims.getExpiration().after(new Date(System.currentTimeMillis()));
    }

    private Claims getClaims(String token) {
        return Jwts.parser().setSigningKey(key).parseClaimsJws(token).getBody();
    }
}Now, we can implement our scenario. I add BCryptPasswordEncoder bean definition to main class, so I can access it from anywhere else. You don't need to do it here. Just preference.
@SpringBootApplication
public class Scenario3 {

    public static void main(String[] args) {
        SpringApplication.run(Scenario3.class, args);
    }

    // Creating a bean for password encryption
    @Bean
    public BCryptPasswordEncoder getBCryptPasswordEncoder() {
        return new BCryptPasswordEncoder();
    }
}Let's also add login endpoint to my BasicController class. This will help me to do post request to http://localhost:8080/login endpoint. Request body will have username and password in JSON format.
@RestController
class BasicController {
    @Autowired
    private JwtUtil jwtUtil;

    // injecting authentication manager
    @Autowired
    private AuthenticationManager authenticationManager;

    @PostMapping("login")
    public ResponseEntity<String> login(@RequestBody LoginRequestDTO request) {
        // Creating UsernamePasswordAuthenticationToken object
        // to send it to authentication manager.
        // Attention! We used two parameters constructor.
        // It sets authentication false by doing this.setAuthenticated(false);
        UsernamePasswordAuthenticationToken token = new UsernamePasswordAuthenticationToken(request.getUsername(), request.getPassword());
        // we let the manager do its job.
        authenticationManager.authenticate(token);
        // if there is no exception thrown from authentication manager,
        // we can generate a JWT token and give it to user.
        String jwt = jwtUtil.generate(request.getUsername());
        return ResponseEntity.ok(jwt);
    }

    @GetMapping("/hello")
    public ResponseEntity<String> get(){
        return ResponseEntity.ok("Hello");
    }
}

@Data
@NoArgsConstructor
class LoginRequestDTO {
    private String username;
    private String password;
}
This new endpoint will send username and password to Authentication Manager by wrapping them with UsernamePasswordAuthenticationToken object.
When Authentication Manager does not throw an exception, it means that authentication is successful, so endpoint will return a new generated JWT token to the user. Thus, the user can make API calls other endpoints by using the token.
According to this controller, we are sending username and password directly to Authentication Manager. We know that Authentication Manager will call available Authentication Provider. In our scenario, we will not create a custom provider. It means Spring Security will pick up default provider, which is DaoAuthenticationProvider.
However, we will implement custom UserDetailsService. It will basically check a user from a map data structure. In real world scenario, this is the place you fetch data from database.
/*
* Custom UserDetailsService implementation
*/
@Service
class UserDetailsService implements org.springframework.security.core.userdetails.UserDetailsService {
    @Autowired
    BCryptPasswordEncoder passwordEncoder;

    @Override
    public UserDetails loadUserByUsername(String username) throws UsernameNotFoundException {
        // This is where you should fetch the user from database.
        // We keep it simple to focus on authentication flow.
        Map<String, String> users = new HashMap<>();
        users.put("martin", passwordEncoder.encode("123"));
        if (users.containsKey(username))
            return new User(username, users.get(username), new ArrayList<>());
        // if this is thrown, then we won't generate JWT token.
        throw new UsernameNotFoundException(username);
    }
}
So far, we are able to authenticate a user. There is one step left. If user is already authenticated, we should let Spring Security know that. The common way to solve this is of course defining a filter for the filter chain, so we can find out if there is a JWT token before letting the request hit DispatcherServlet and endpoints from there.
/*
* Custom filter will run once per request. We add this to Filter Chain
*/
@Component
class JwtTokenFilter extends OncePerRequestFilter {
// Simple JWT implementation
@Autowired
private JwtUtil jwtUtil;
// Spring Security will call this method during filter chain execution
@Override
protected void doFilterInternal(HttpServletRequest httpServletRequest,
HttpServletResponse httpServletResponse,
FilterChain filterChain) throws ServletException, IOException {
// trying to find Authorization header
final String authorizationHeader = httpServletRequest.getHeader("Authorization");
if (authorizationHeader == null || authorizationHeader.isEmpty() || !authorizationHeader.startsWith("Bearer")){
// if Authorization header does not exist,
// then skip this filter
// and continue to execute next filter class
filterChain.doFilter(httpServletRequest, httpServletResponse);
return;
}
final String token = authorizationHeader.split(" ")[1].trim();
if (!jwtUtil.validate(token)) {
// if token is not valid, then skip this filter
// and continue to execute next filter class.
// This means authentication is not successful
// since token is invalid.
filterChain.doFilter(httpServletRequest, httpServletResponse);
return;
}
// Authorization header exists, token is valid.
// So, we can authenticate.
String username = jwtUtil.getUsername(token);
// initializing UsernamePasswordAuthenticationToken
// with its 3 parameter constructor because
// it sets super.setAuthenticated(true); in that constructor.
UsernamePasswordAuthenticationToken upassToken = new UsernamePasswordAuthenticationToken(username, null, new ArrayList<>());
upassToken.setDetails(new WebAuthenticationDetailsSource().buildDetails(httpServletRequest));
// finally, give the authentication token to Spring Security Context
SecurityContextHolder.getContext().setAuthentication(upassToken);
// end of the method, so go for next filter class
filterChain.doFilter(httpServletRequest, httpServletResponse);
}
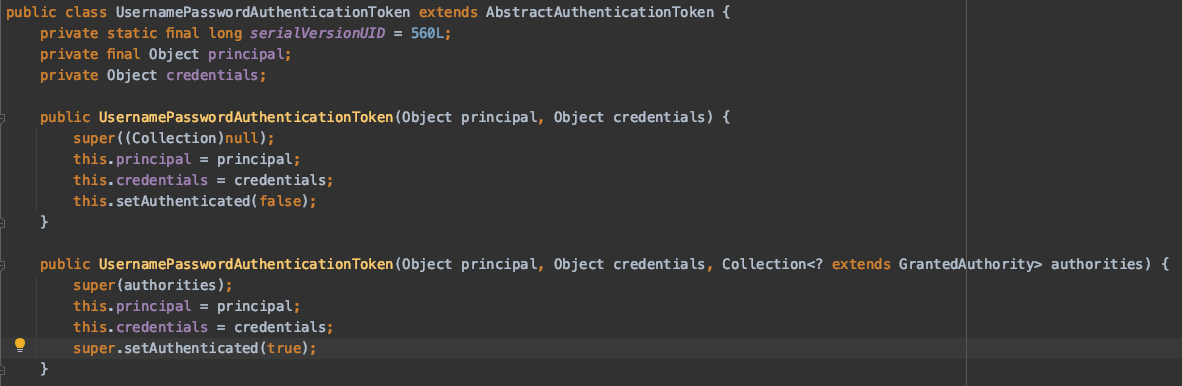
}There is one critical step here. We created UsernamePasswordAuthenticationToken object, but this time with 3 parameter constructor. We used this class in our /login endpoint as well, but we set it with username and password for that case.
There is a reason for it. If you check UsernamePasswordAuthenticationToken, you will see that first constructor has line with this.setAuthenticated(false). We use this 2 parameters constructor when we want to attempt an authentication, so the token goes through this order.
AuthenticationManager -> AuthenticationProvider -> UserDetailsService
But the second constructor has super.setAuthenticated(true). We use this constructor when we validated user's JWT token and want to authenticate the request in SecurityContext.
The SecurityContextHolder is the class which is storing authenticated users in memory, so the request is known for later on.
Very small trick, but big change in the flow.
Finally, we do general configuration for Spring Security. We define our custom filter and custom UserDetailsService as @Autowired beans.
/*
* This is Spring Security configuration step
*/
@Configuration
@EnableWebSecurity
@EnableGlobalMethodSecurity(prePostEnabled = true)
class WebSecurityConfiguration extends WebSecurityConfigurerAdapter {

    // Custom filter
    @Autowired
    private JwtTokenFilter jwtTokenFilter;

    // Custom UserDetailsService
    @Autowired
    private UserDetailsService userDetailsService;

    @Autowired
    BCryptPasswordEncoder passwordEncoder;

    @Autowired
    public void configurePasswordEncoder(AuthenticationManagerBuilder builder) throws Exception {
        // adding custom UserDetailsService and encryption bean to Authentication Manager
        builder.userDetailsService(userDetailsService).passwordEncoder(passwordEncoder);
    }

    @Bean
    public AuthenticationManager getAuthenticationManager() throws Exception {
        return super.authenticationManagerBean();
    }

    @Override
    protected void configure(HttpSecurity http) throws Exception {
        http
                // disabling csrf since we won't use form login
                .csrf().disable()

                // giving every permission to every request for /login endpoint
                .authorizeRequests().antMatchers("/login").permitAll()
                // for everything else, the user has to be authenticated
                .anyRequest().authenticated()
                // setting stateless session, because we choose to implement Rest API
                .and().sessionManagement()
                .sessionCreationPolicy(SessionCreationPolicy.STATELESS);

        // adding the custom filter before UsernamePasswordAuthenticationFilter in the filter chain
        http.addFilterBefore(jwtTokenFilter, UsernamePasswordAuthenticationFilter.class);
    }
}
Scenario 4: Adding up custom authentication provider implementation
If you are developing an enterprise application, sooner or later you will need to add custom authentication methods. For instance, your main authentication method might be JWT token based. However, your company might want to support for another authentication flow. Then, you are supposed to extend the existing functionality. Before jumping to multiple authentication provider implementation, we need to understand implementing one custom authentication provider.
As you can see below, I am implementing JWT authentication provider by implementing AuthenticationProvider interface coming from Spring Security.
@Component
class JwtAuthenticationProvider implements AuthenticationProvider {
    // Injecting available encryption bean
    @Autowired
    private PasswordEncoder passwordEncoder;

    // Injecting our custom UserDetailsService implementation
    @Autowired
    private UserDetailsService userDetailsService;

    @Override
    public Authentication authenticate(Authentication authentication) throws AuthenticationException {
        // In BasicController.login() method, we call authenticationManager.authenticate(token)
        // Then, Authentication Manager calls AuthenticationProvider's authenticate method.
        // Since JwtAuthenticationProvider is our custom authentication provider,
        // this method will be executed.
        String username = authentication.getName();
        String password = String.valueOf(authentication.getCredentials());

        // Fetching user as wrapped with UserDetails object
        UserDetails userDetails = userDetailsService.loadUserByUsername(username);

        // If user is not null, then we check if password matches
        if (userDetails != null){
            if (passwordEncoder.matches(password, userDetails.getPassword())){
                // if it matches, then we can initialize UsernamePasswordAuthenticationToken.
                // Attention! We used its 3 parameters constructor.
                UsernamePasswordAuthenticationToken authenticationToken =
                        new UsernamePasswordAuthenticationToken(username, password, userDetails.getAuthorities());
                return authenticationToken;
            }
        }
        throw new BadCredentialsException("Error!!");
    }

    // Authentication Manager checks if the token is supported by this filter
    // to avoid unnecessary checks.
    @Override
    public boolean supports(Class<?> authenticationType) {
        return UsernamePasswordAuthenticationToken.class.equals(authenticationType);
    }
}
I am using our custom UserDetailsService implementation in the custom provider. We didn't use it like this before, because we gave this custom UserDetailsService bean to Authentication Manager and it was used in the default authentication provider. Since we are implementing our custom authentication provider, it is time to use this in the provider implementation.
However, you do not have to use UserDetailsService implementation in your custom authentication provider. You can basically fetch the user with your UserRepository implementation. I am using our custom UserDetailsService implementation to show the connection.
The current flow is below.
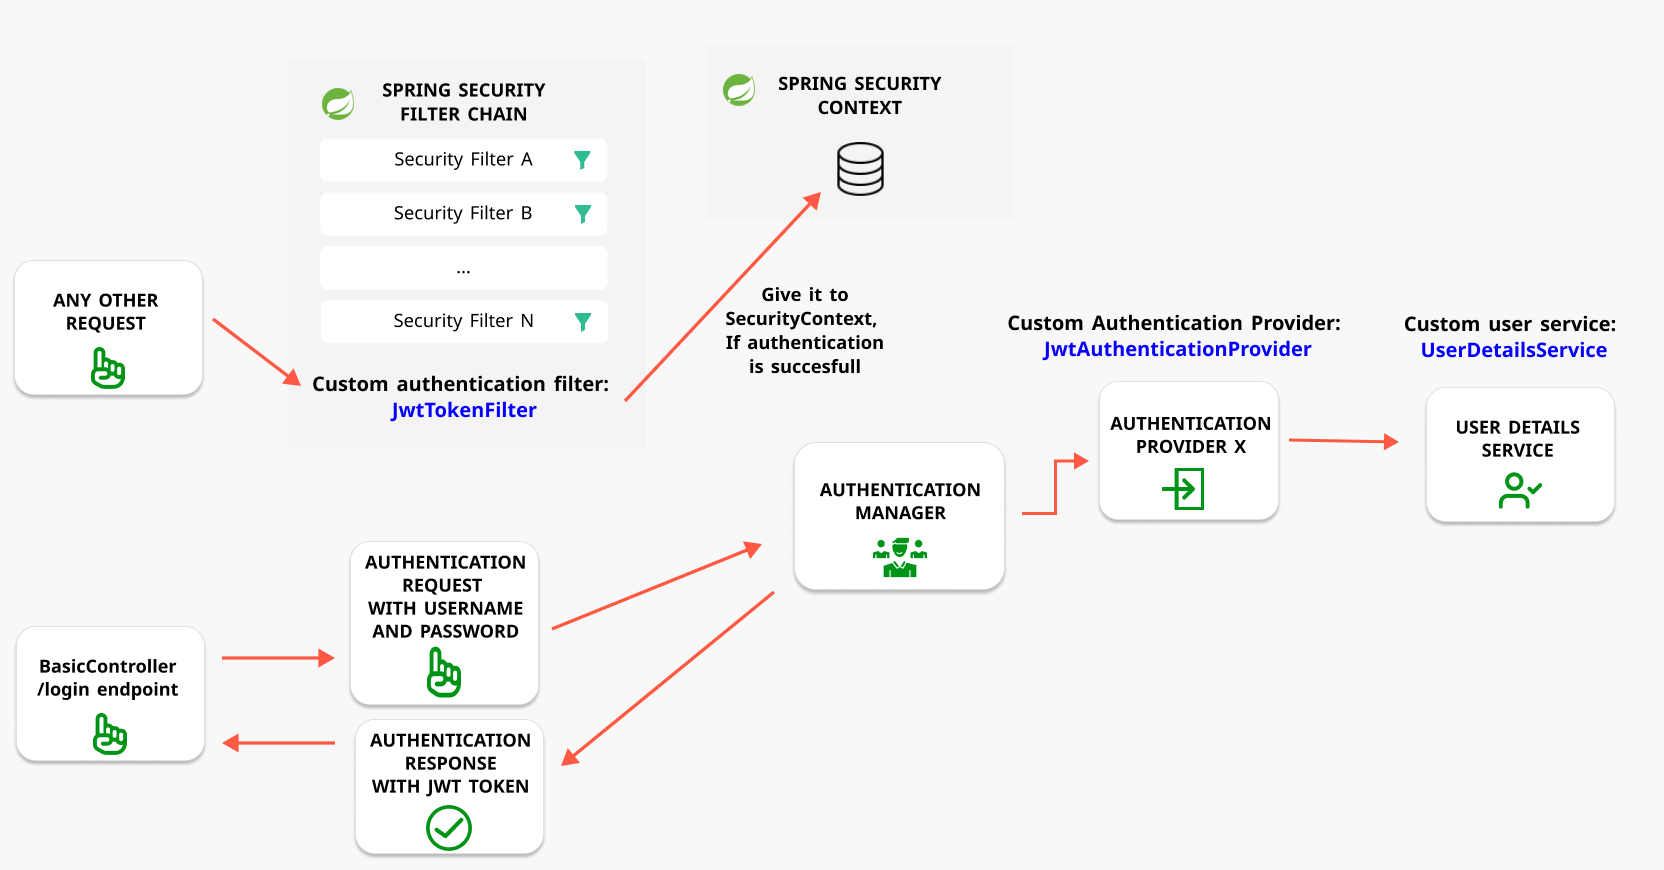
To activate this custom provider, we need to update our security configuration. I comment out UserDetailsService related code pieces, because we do not need to give it to Authentication Manager anymore.
@Configuration
@EnableWebSecurity
@EnableGlobalMethodSecurity(prePostEnabled = true)
class WebSecurityConfiguration extends WebSecurityConfigurerAdapter {

    @Autowired
    private JwtTokenFilter jwtTokenFilter;

//    @Autowired
//    private UserDetailsService userDetailsService;

    @Autowired
    BCryptPasswordEncoder passwordEncoder;

    @Autowired
    JwtAuthenticationProvider customAuthenticationProvider;

    // we are not using default authentication provider,
    // so we do not need to set these here.
    // we set these things in the our custom authentication provider.
//    @Autowired
//    public void configurePasswordEncoder(AuthenticationManagerBuilder builder) throws Exception {
//        builder.userDetailsService(userDetailsService).passwordEncoder(passwordEncoder);
//    }

    @Bean
    public AuthenticationManager getAuthenticationManager() throws Exception {
        return super.authenticationManagerBean();
    }

    // adding our custom authentication provider
    // authentication manager will call this customer provider's
    // authenticate method from now on.
    @Override
    protected void configure(AuthenticationManagerBuilder auth) {
        auth.authenticationProvider(customAuthenticationProvider);
    }

    @Override
    protected void configure(HttpSecurity http) throws Exception {
        http
                // disabling csrf since we won't use form login
                .csrf().disable()

                // giving every permission to every request for /login endpoint
                .authorizeRequests().antMatchers("/login").permitAll()
                // for everything else, the user has to be authenticated
                .anyRequest().authenticated()
                // setting stateless session, because we choose to implement Rest API
                .and().sessionManagement()
                .sessionCreationPolicy(SessionCreationPolicy.STATELESS);

        // adding the custom filter before UsernamePasswordAuthenticationFilter in the filter chain
        http.addFilterBefore(jwtTokenFilter, UsernamePasswordAuthenticationFilter.class);
    }
}
Scenario 5: Adding up multiple custom authentication providers implementations
Now, we know how to add custom authentication providers. Then, we can jump to a scenario that force us to implement multiple custom authentication providers.
Let's say our company decided to add Google Cloud as an authentication provider. We have a user database, yes. But new users will go to Google Cloud database and we need to check if a user either exists in our database or Google Cloud database. We have a very short deadline, so we can not move all the users to Google Cloud database. :)
Let's add imaginary Google Cloud Authentication Provider.
@Component
class GoogleCloudAuthenticationProvider implements AuthenticationProvider {
    @Override
    public Authentication authenticate(Authentication authentication) throws AuthenticationException {
        String username = authentication.getName();
        String password = String.valueOf(authentication.getCredentials());

        // We fetch user from Google API "in theory"
        User user = getUserFromGoogleCloud(username, password);
        if (user != null) {
            UsernamePasswordAuthenticationToken authenticationToken =
                    new UsernamePasswordAuthenticationToken(username, password, user.getAuthorities());
            return authenticationToken;
        }
        throw new BadCredentialsException("Error!!");
    }

    // Let's assume Google API will return the user in this method.
    private User getUserFromGoogleCloud(String username, String password) {
        Map<String, String> users = new HashMap<>();
        users.put("martin", "123");
        if (users.get(username) != null){
            return new User(username, password, Collections.emptyList());
        }
        return null;
    }

    @Override
    public boolean supports(Class<?> authenticationType) {
        return UsernamePasswordAuthenticationToken.class.equals(authenticationType);
    }

}
We add a new authentication provider as we did before. Since I do not want to increase complexity, I added imaginary API call in the implementation.
Let's update configuration class as well. We add another authentication provider the same way we did before. Remember that authentication manager will try these providers in the order you set. For instance, it will try JwtAuthenticationProvider and GoogleCloudAuthenticationProvider respectively.
@Configuration
@EnableWebSecurity
@EnableGlobalMethodSecurity(prePostEnabled = true)
class WebSecurityConfiguration extends WebSecurityConfigurerAdapter {

    @Autowired
    private JwtTokenFilter jwtTokenFilter;

    // Injecting JWT custom authentication provider
    @Autowired
    JwtAuthenticationProvider customAuthenticationProvider;

    // Injecting Google custom authentication provider
    @Autowired
    GoogleCloudAuthenticationProvider googleCloudAuthenticationProvider;

    @Bean
    public AuthenticationManager getAuthenticationManager() throws Exception {
        return super.authenticationManagerBean();
    }

    // adding our custom authentication providers
    // authentication manager will call these custom provider's
    // authenticate methods from now on.
    @Override
    protected void configure(AuthenticationManagerBuilder auth) {
        auth.authenticationProvider(customAuthenticationProvider)
                .authenticationProvider(googleCloudAuthenticationProvider);
    }

    @Override
    protected void configure(HttpSecurity http) throws Exception {
        http
                // disabling csrf since we won't use form login
                .csrf().disable()

                // giving every permission to every request for /login endpoint
                .authorizeRequests().antMatchers("/login").permitAll()
                // for everything else, the user has to be authenticated
                .anyRequest().authenticated()
                // setting stateless session, because we choose to implement Rest API
                .and().sessionManagement()
                .sessionCreationPolicy(SessionCreationPolicy.STATELESS);

        // adding the custom filter before UsernamePasswordAuthenticationFilter in the filter chain
        http.addFilterBefore(jwtTokenFilter, UsernamePasswordAuthenticationFilter.class);
    }
}
After all these settings, here we have the latest authentication flow.
Conclusion
So, when to use which scenario?
- If your application will be a small one and there is no expected future development required, then you can go with Scenario 3 which means custom filter and custom
UserDetailsService. - If your application will have expected future developments, like growing continuously and require many integrations, then I would start with Scenario 4 which means custom
AuthenticationProviderand filter. - Scenario 5 is just an example to show why you might want to choose Scenario 4.
Source code for all of the scenarios is available on Github.
Repository names are as follows:
- spring-security-authentication-scenario-3
- spring-security-authentication-scenario-4
- spring-security-authentication-scenario-5
Member discussion