Spring Security: Authorization Mechanism Behind The Scenes
In simple words, authorization is giving someone permission to access a resource. In Spring Security, FilterSecurityInterceptor servlet is used to determine whether a certain request is allowed to access certain resource.
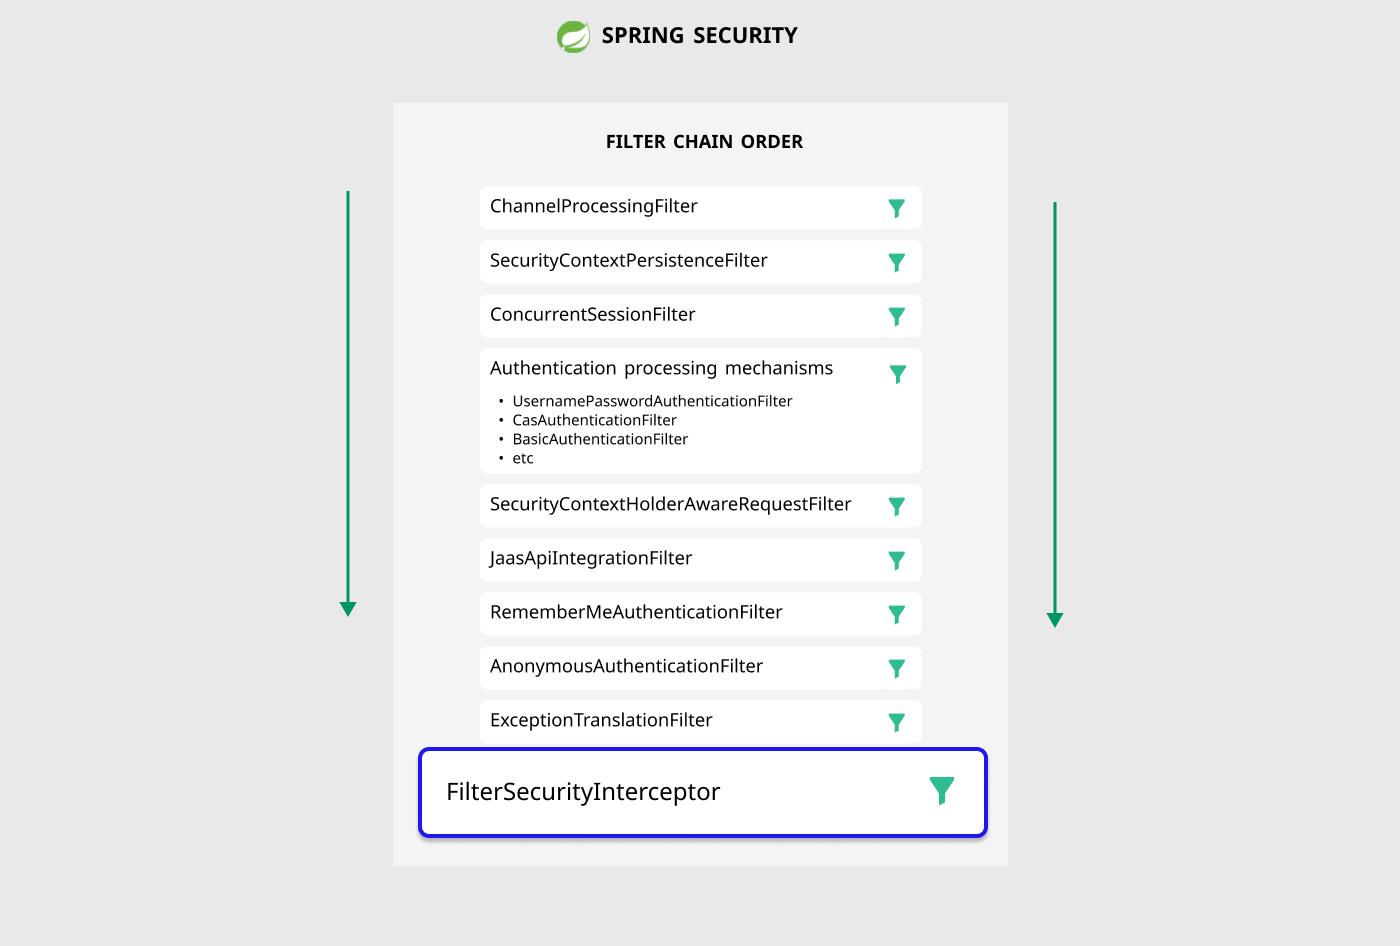
FilterSecurityInterceptor is the last filter class in the FilterChain. Because FilterSecurityInterceptor needs authenticated user before it tries to check if user has permission for given resource. This is why authentication filters should always run before authorization filter.
Let’s deep dive from here.
FilterSecurityInterceptor
FilterSecurityInterceptor triggers authorization checking process. When incoming request hits this class, this filter checks if authenticated user has right to access for requested resource. Requested resource can be an endpoint like /user/message/me.
- If permission exists,
FilterSecurityInterceptorlets user access to resource. - If not,
FilterSecurityInterceptorwill throw an exception.
Okay, enough mentioning how things get triggered...
So, how does FilterSecurityInterceptor work in the background?
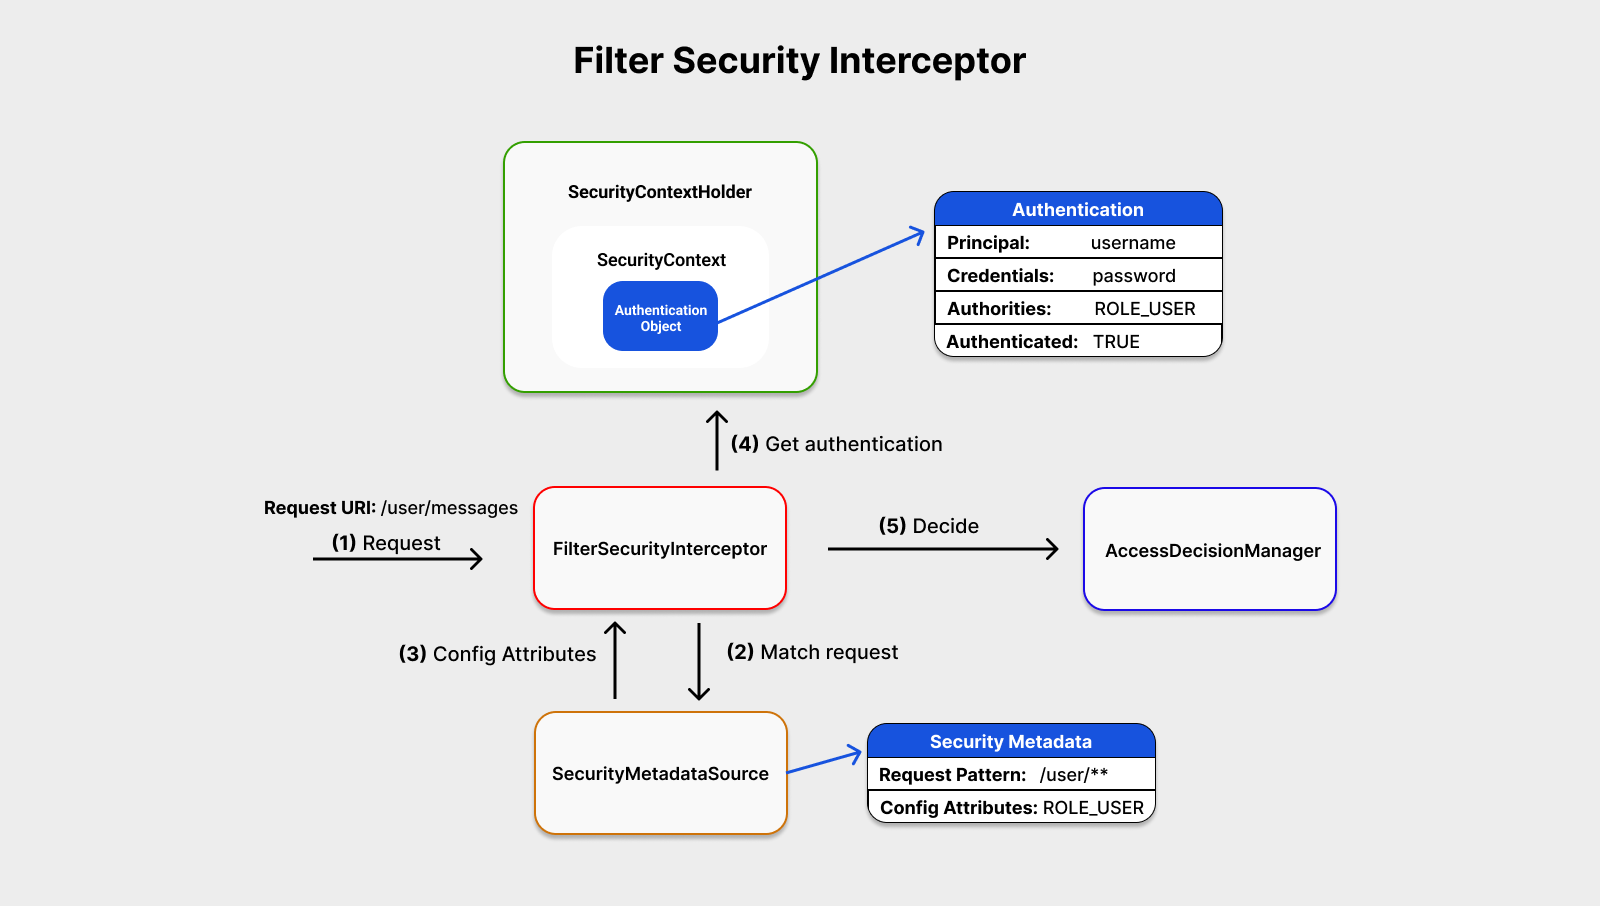
1) Incoming request hits FilterSecurityInterceptor servlet filter.
2-3) FilterSecurityInterceptor ask for Security Metadata that matches given url pattern from SecurityMetadataSource class. In this example, this object says /user/** url pattern has only access for ROLE_USER.
This object is actually defined when you configure Spring Security. For instance, I set ROLE_USER for /user/** pattern in this code.
4) FilterSecurityInterceptor gets authenticated object from SecurityContextHolder, so FilterSecurityInterceptor get to know which role the user has.
Here you can see how you can give this object to Spring Security Context. I create an object called token that has username, credentials and authorities(roles). Then, I give it to SecurityContextHolder.
// initializing UsernamePasswordAuthenticationToken with its 3 parameter constructor
// because it sets super.setAuthenticated(true); in that constructor.
UsernamePasswordAuthenticationToken token = new UsernamePasswordAuthenticationToken(user.getUsername(), // username
    null, // null for credentials
    user.getAuthorities() // List of roles, e.g. ROLE_USER
);
upassToken.setDetails(new WebAuthenticationDetailsSource().buildDetails(httpServletRequest));

// finally, give the authentication token to Spring Security Context
SecurityContextHolder.getContext().setAuthentication(upassToken);
5) FilterSecurityInterceptor sends these objects to AccessDecisionManager, so decision will be made.
As you see, FilterSecurityInterceptor is just a middleware between decision making and incoming request. Let's go one more step down in the process and understand how decision making works as well.
Access Decision
AccessDecisionManager is an interface which is responsible to decide if given user has permission to access for given resource. See diagram below.
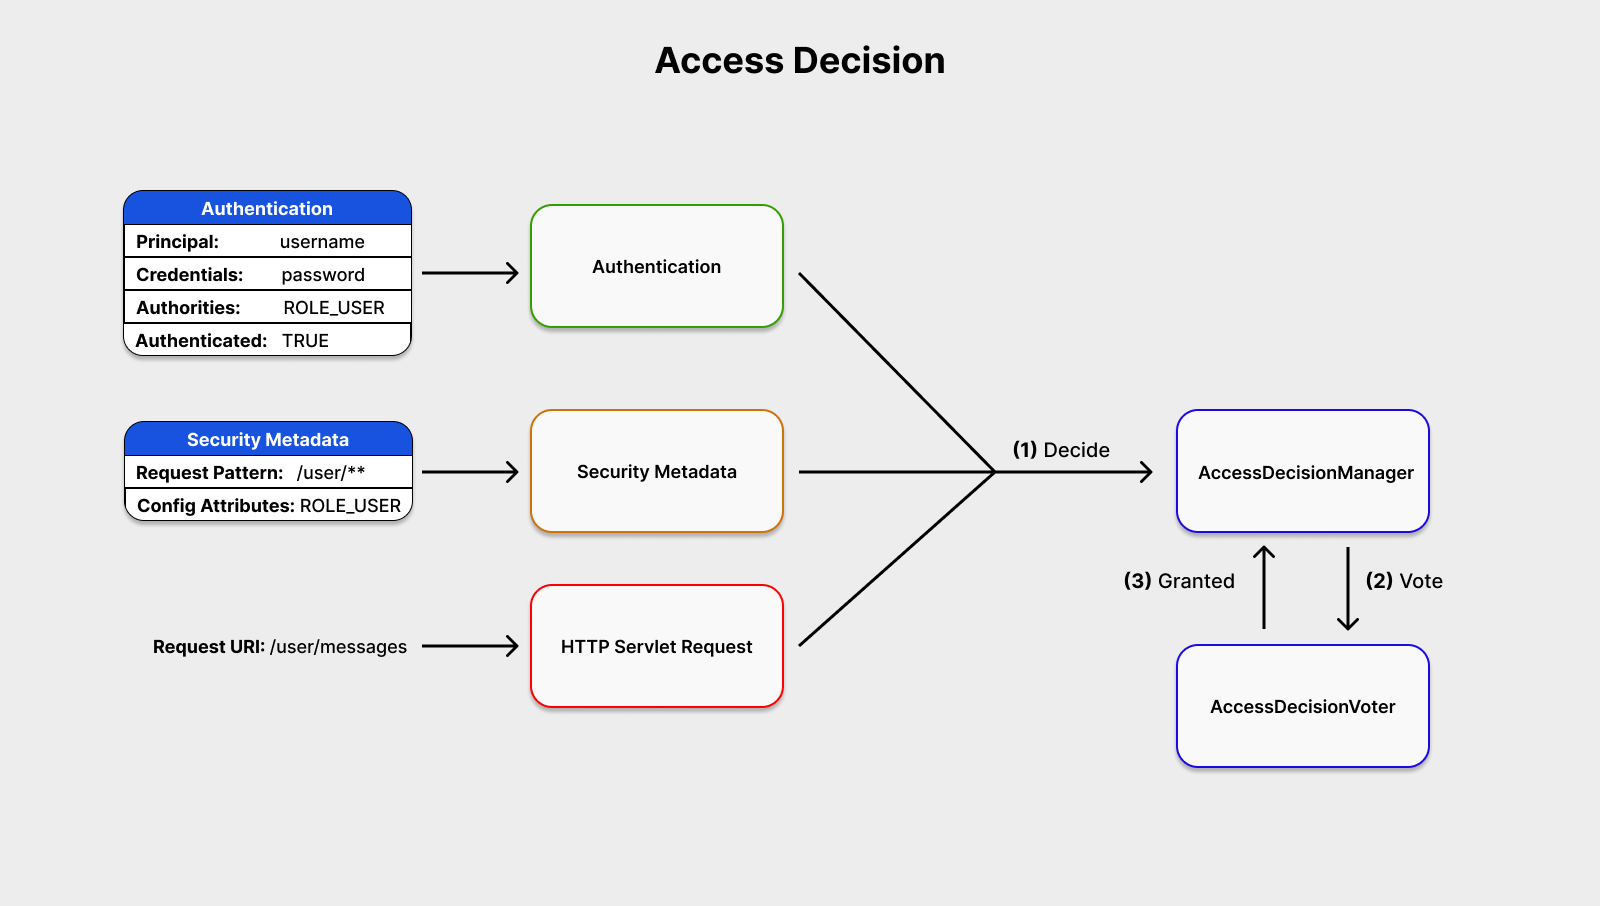
It has pretty simple flow. It gets authentication object which has role information for user, security metadata which has required role for certain url pattern, and requested url.
Ok, what about underlying components for AccessDecisionManager?
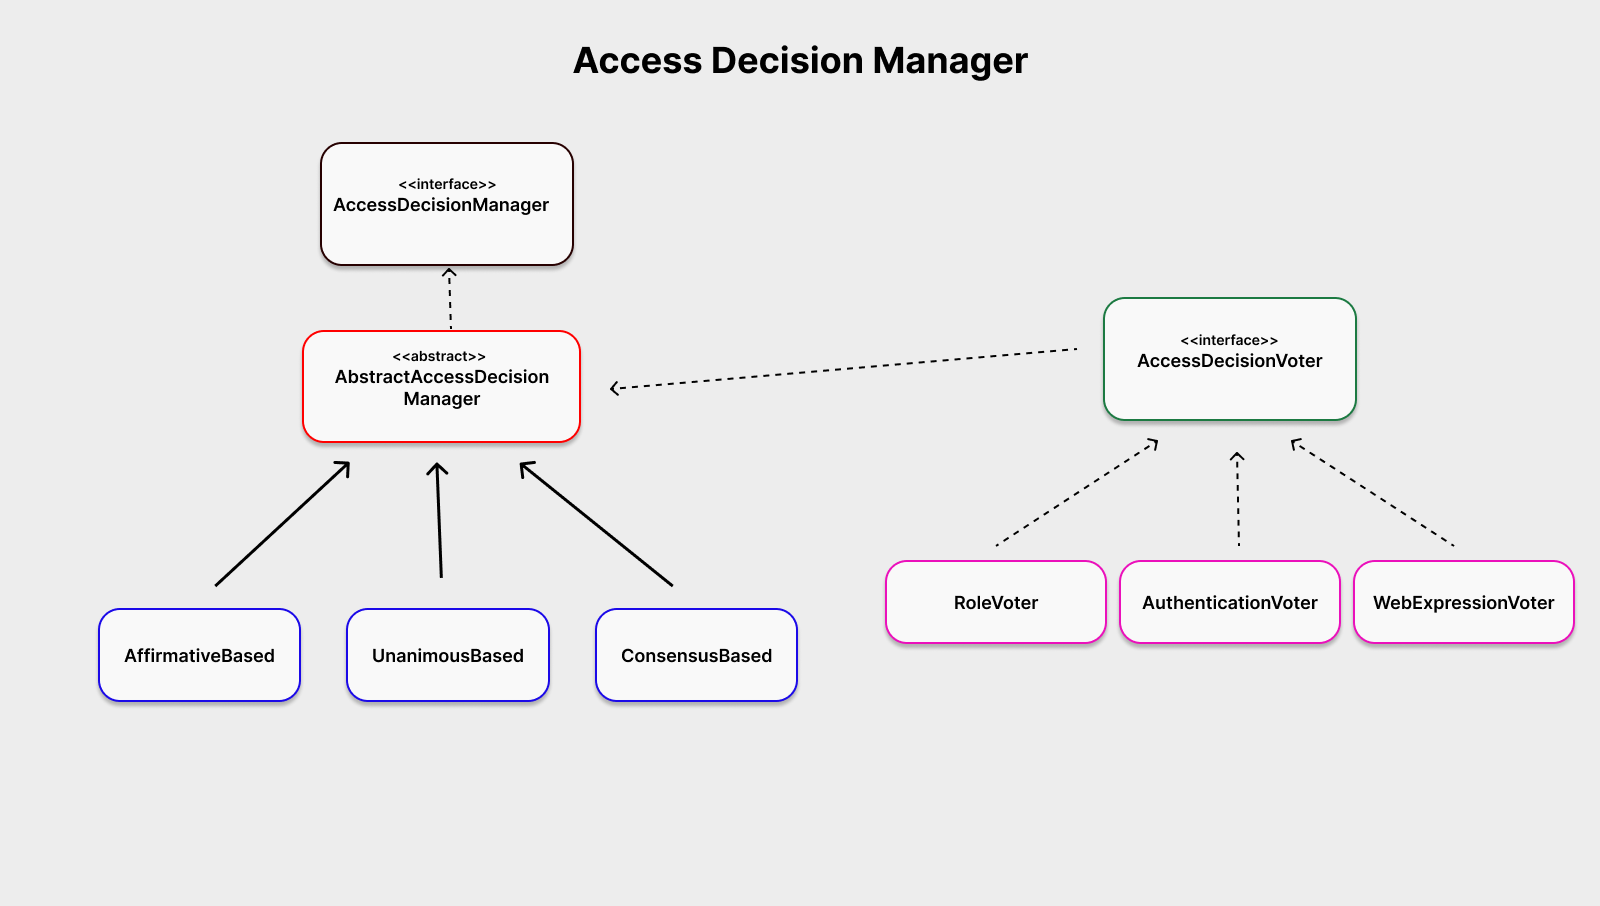
AccessDecisionManager has abstract class named AbstractAccessDecisionManager. However, you can see that there are three implementations underneath. Here, you can see short descriptions for these implementations.
- AffirmativeBased (default): grant access if one or more
ACCESS_GRANTEDvotes were received - UnanimousBased: expects unanimous
ACCESS_GRANTEDvotes in order to grant access, ignoring abstains - ConsensusBased: grant or deny access based on the consensus of non-abstain votes
According to Spring Security 4.0.x documentation, The default strategy is to use an AffirmativeBased AccessDecisionManager with a RoleVoter and an AuthenticatedVoter.
So, let's check what they do as well.
- RoleVoter: vote to grant access if there is a exactly equal to one or more
ConfigAttributesstarting with the prefixROLE_ - AuthenticatedVoter: When we’ve used the attribute
IS_AUTHENTICATED_ANONYMOUSLYto grant anonymous access, this attribute was being processed by theAuthenticatedVoter.
Conclusion
You will probably not need to use custom voter or access decision manager implementation. However, it is always good to know how things work under the hood. Because knowing internal design gives you following benefits.
- more flexibility to develop custom implementations.
- makes you less framework dependent.
- understand the mindset in the framework you use.
If you have custom implementations for voting or access decision manager, then check this link. Spring Security introduced new class called AuthorizationManager with version 5.0.x. You will need to adapt your custom classes if you want to upgrade your version.
If you would like to see a sample project for authorization flow, please visit this repo. The code samples I shared in this article are from this repo as well.
 ugurcanlacin
Member discussion